




Before you turn a creator’s product demo into a Meta ad, answer two questions: are you authorized to run that exact asset, and can the campaign recover the cost of using it?
For ecommerce sellers, those questions connect influencer marketing with paid-media execution. A completed post is a starting point, not a complete advertising plan.
This Meta partnership ads guide explains the permissions, setup, creative decisions, and measurement needed to move from creator content to a controlled sales test. It also shows why a lower advertising cost per purchase can still produce a more expensive campaign.
Key Takeaways
- Separate the creator’s commercial usage agreement from the permission that enables partnership ads inside Meta.
- Count assets that are licensed, permissioned, and launch-ready rather than treating every completed creator post as an available ad.
- Match measurement to the destination: Shopify store events and Amazon Attribution require different setups.
- Compare media spending plus creator-related costs before deciding that a partnership ad is cheaper than your existing creative.
Meta Partnership Ads Guide: Start With an Ad Record
Meta partnership ads are paid ads that use an authorized partner’s identity, such as a creator’s account, on Facebook or Instagram. Meta’s partnership ads overview explains the format, previously called branded content ads, which supports partnerships with creators and other businesses.
Three concepts need to stay separate. A paid partnership label discloses a commercial relationship on content. A partnership ad adds paid distribution through Meta’s advertising tools. Licensing creator-made UGC for a brand’s own marketing concerns usage rights, which should specify whether creator-identity advertising is included.
Do not treat a tagged post, a downloaded video, and an authorized partnership ad as interchangeable deliverables.
The Five-Field Ad Record
Create one record for each intended ad asset, not just one folder per influencer campaign. Use these five fields to connect the commercial agreement with the actual launch:
- Asset identity: Creator handle, original post URL or file, exact edit version, and an internal asset ID.
- Commercial license: Permitted channels, territory, advertising dates, editing rights, compensation, and renewal terms.
- Meta permission: Content-level authorization or account-level approval, its status, and the responsible contact.
- Approved creative: Final copy, disclosure, audio clearance, product claims, and placement-ready versions.
- Destination and reporting: Landing page, tracking identifier, campaign and ad IDs, and the person responsible for pausing or renewing usage.
Keep the advertising start and end dates beside the permission record. A valid code should never become the reason an ad keeps running beyond the agreed usage period.
Stack Influence’s Meta partnership ad workflow separates product seeding and completed posts from requesting creator ad codes. Its service page explicitly notes that not every creator will provide a code. That operational distinction belongs in the campaign plan before content is commissioned.
Count Launchable Ads, Not Delivered Posts
Consider an illustrative prelaunch batch of 24 delivered creator assets. Assume 18 have written paid-media rights, 15 of those also have active Meta permission, and 12 of those pass the final creative, disclosure, destination, and tracking checks.
These are nested counts, not separate groups: 24 delivered, 18 licensed, 15 licensed and permissioned, and 12 fully ready. The launchable share is 12 divided by 24, or 50%.
This is not a Stack Influence result or an industry benchmark. It illustrates why ordering more content is not always the next useful move: the immediate bottleneck might be permissions, an unsuitable edit, or unfinished tracking.
How Do You Set Up Meta Partnership Ads?
Set up partnership ads by confirming eligibility, agreeing on paid usage, obtaining the appropriate creator permission, and building the ad in Ads Manager. Finish by checking the identity, creative, destination, and reporting before spending begins.
1. Confirm Account Eligibility and Access
Start with Meta’s partnership ads help center to check the requirements applicable to the creator’s account and intended content. Instagram uses professional accounts for these tools; Facebook availability includes eligible Pages and profiles in professional mode.
Confirm that the brand’s ad account is usable, the correct identities are connected, and the person building the campaign has the necessary advertising access. Resolve restrictions through Meta’s account tools rather than repeatedly rebuilding the same rejected ad.
Before requesting content, ask the creator to confirm that partnership-ad settings are available on the account they will use. Menu wording and available options can vary, so verify the current interface rather than relying on an old screenshot.
2. Agree on the License and Permission Scope
Write the paid-media agreement before requesting the platform permission. State the exact content, authorized advertiser, channels, duration, territory, allowed edits, approvals, fees, and what happens if permission is withdrawn.
The agreement should distinguish ordinary reposting from advertising through the creator’s identity. A practical review of UGC licensing rights helps keep those uses separate without defaulting to an unnecessarily broad, perpetual license.
Meta’s permission guidance explains that advertisers need their partner’s permission and that partners can revoke it. Content-level permission concerns specific content; account-level permission supports a broader approved advertising relationship.
For a first test, request only the access needed for the agreed assets. For an ongoing relationship, document the scope of account-level permission explicitly. Neither option should require exchanging passwords, and broader technical access should not be interpreted as broader contractual rights.
3. Collect the Code or Complete the Partnership Approval
For an eligible Instagram post, Reel, or Story, have the creator open its partnership-ad settings and generate the code. Instagram’s ad-code instructions describe the “Partnership label & ads” settings and “Get partnership ad code” control.
Save the code against the exact asset in the Five-Field Ad Record. Verify that it resolves to the expected creator and content before scheduling media.
When using account-level permission instead, complete the partnership request and acceptance through the available partnership tools. Treat “request sent” and “permission approved” as different statuses.
4. Build the Ad in Ads Manager
Follow Meta’s Ads Manager creation instructions for the supported setup. Create the campaign, select an objective appropriate to the destination and measurable outcome, and configure the audience, budget, schedule, and placements.
At the ad level, enable the partnership-ad option and select the authorized identities. For existing content, use the option to enter an ad code or post information, then confirm the selected asset.
Add the destination, call to action, and tracking where supported. Preview every intended placement and check which identities are displayed; do not assume every configuration presents the header identically.
For a Shopify purchase campaign, verify the relevant purchase measurement before choosing purchase optimization. For an Amazon destination, do not assume a Shopify pixel supplies Amazon checkout events.
5. Complete the Launch Handoff
Before publishing, reconcile the final ad with the agreement: correct creator, correct edit, correct product, correct destination, and an end date within the license period. Check the live offer, stock, mobile page, and tracking link yourself.
Record the approved ad ID and assign a person to monitor permission changes, customer questions, and usage expiry. This makes the Five-Field Ad Record useful after launch rather than leaving it as a preproduction checklist.
Which Creator Content Should You Test First?
Test content that demonstrates the product and answers a buying objection, not simply the post with the most likes. Treat organic response as a source of hypotheses, then test those hypotheses against paid purchase outcomes.
For a backpack, useful concepts might show what fits inside, demonstrate access to a laptop compartment, or explain a packing routine. Those are different buying questions. Three versions of the same unboxing may provide less learning than distinct demonstrations.
When hiring influencers for ecommerce campaigns, evaluate whether the creator can explain the product credibly, deliver the required formats, and agree to the intended advertising scope. Micro influencers, nano influencers, and UGC creators can all enter that evaluation; follower count alone should not determine the creative shortlist.
Brief for Advertising Before Product Seeding
Tell creators whether the planned deliverable is an organic post, a reusable video asset, a partnership-ad candidate, or a combination. Ask for a clear product demonstration, understandable speech, legible captions, and audio cleared for the intended advertising use.
Stack Influence’s gifted-first model connects ecommerce brands with vetted micro influencers and ties campaign payment to completed creator posts. Its automated product-seeding workflow supports that execution, while its UGC workflow supports collecting content for reuse. Build the intended paid-ad requirements into the brief rather than adding them after delivery.
Preserve Honest Endorsements and Clear Disclosure
Require disclosure of the actual commercial relationship, including relevant gifted or reimbursed products. The FTC’s influencer disclosure guidance explains that free products can create a material connection and that a platform’s built-in disclosure tool should not automatically be assumed sufficient.
For video endorsements, make the disclosure visible or audible within the video as appropriate, not only in a buried caption. Creators should describe their actual experience, and neither captions nor edits should introduce claims the brand cannot substantiate.
Do not approve an edit that changes a qualified opinion into an absolute promise. Keeping the creator’s meaning intact is part of creative approval, not merely a legal cleanup task.
Where Should the Ad Send Shoppers?

Send shoppers to the purchase destination that matches the offer and the measurement you can actually support. A Shopify product page and an Amazon listing can both serve a campaign, but they should not share an assumed tracking setup.
Shopify and Other Owned Stores
For Shopify, Facebook and Instagram data-sharing settings support Meta pixel and Conversions API integration. Shopify documents server-side purchase sharing for Enhanced and Maximum settings, alongside the pixel; select settings appropriate to your privacy obligations and disclosures.
Verify product-view, cart, and purchase events before launch. Check that a purchase is recorded correctly, including value and currency, rather than assuming installation equals accurate reporting.
Use consistent campaign parameters for an additional analytics view. Google Analytics’ campaign URL guidance explains parameters such as source, medium, campaign, and content, allowing separate creative variants to remain identifiable.
Keep the landing-page promise aligned with the video. An ad showing a particular bundle should not send shoppers to a general catalog where that bundle is difficult to find.
Amazon Listings and Brand Stores
For eligible sellers, Amazon Attribution measures the on-Amazon results of tagged non-Amazon marketing. Its reports include detail-page views, add-to-carts, purchases, and sales, with a 14-day attribution window.
Create a distinct tag for each creative or tactic you need to compare, and use the generated destination link in the ad. Save that identifier beside the Meta ad ID so media spending and Amazon results can be reconciled.
Do not read missing purchases in Meta as proof that an Amazon campaign generated no orders. Review Amazon’s tagged results, and distinguish those measurements from the signals available for optimization inside Meta.
Eligible enrolled brands should also evaluate the Amazon Brand Referral Bonus, which provides referral-fee credits for qualifying external-traffic sales. Count earned credits once in the economics, rather than assuming every attributed sale receives the same benefit.
When Does a Lower Media CPA Actually Pay Back?
A lower media cost per acquisition, or CPA, pays back an additional creator-related fee only when the accumulated media savings exceed that fee. For this comparison, define the acquisition consistently as an attributed purchase, not automatically a new customer.
Budget for media, content production, seeded products, shipping, creator compensation, licensing, edits, and management. Then separate costs shared by both approaches from costs added specifically by the partnership-ad test.
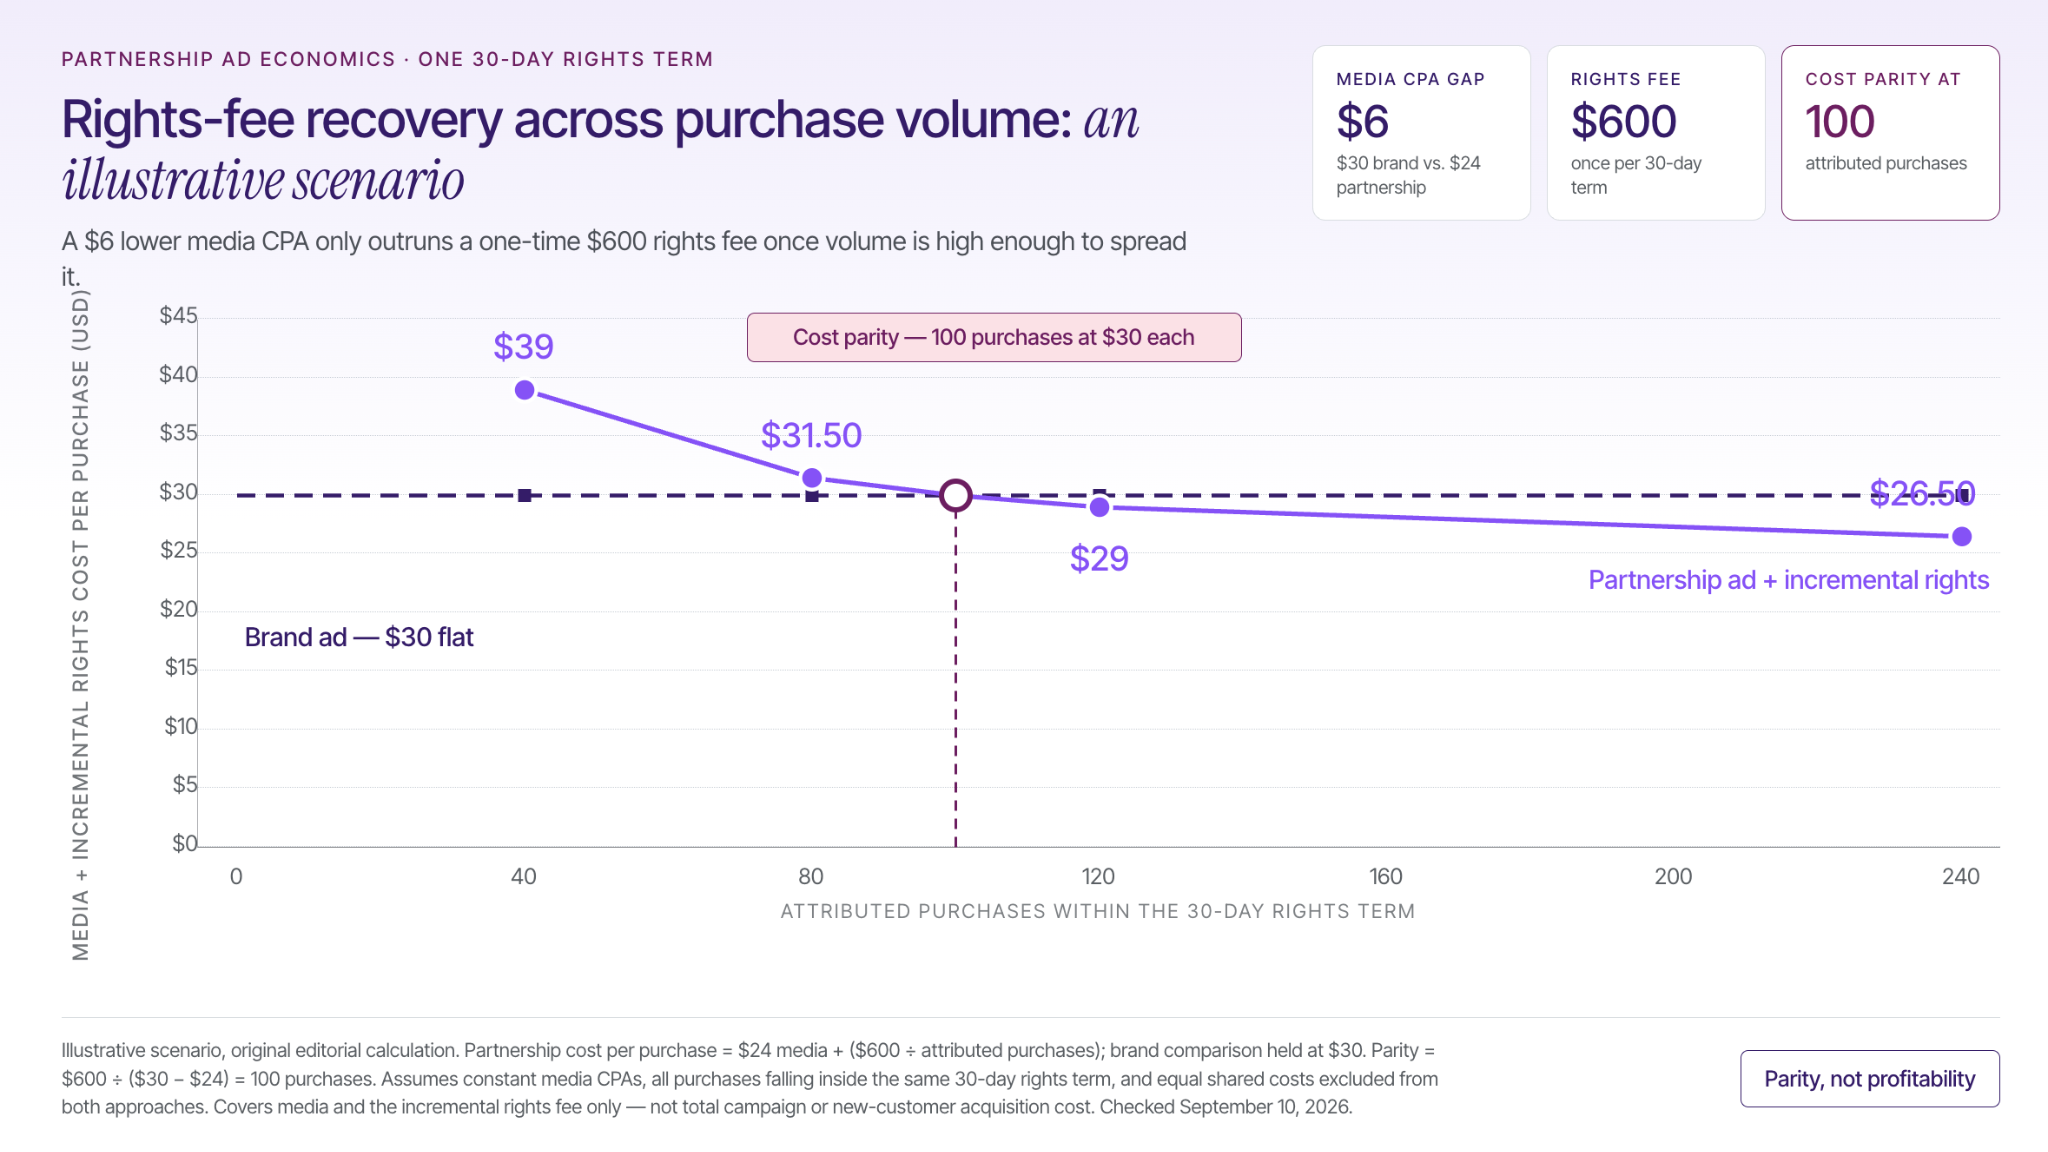
Consider an illustrative scenario with a $30 media cost per purchase for a brand-account ad and $24 for a partnership ad. Assume the partnership ad also requires a one-time $600 incremental rights fee for one agreed 30-day advertising term.
Assume both media CPAs remain constant, each scenario generates its stated purchases within that term, and all other costs are equal and excluded from this comparison. These are modeling assumptions, not market rates, campaign results, or a forecast.
The partnership ad’s media-plus-incremental-rights cost per purchase is $24 + ($600 ÷ attributed purchases):
- 40 purchases: $39.00 per purchase, compared with $30.00 for the brand ad.
- 80 purchases: $31.50, compared with $30.00.
- 100 purchases: $30.00, equal to the brand ad.
- 120 purchases: $29.00, compared with $30.00.
- 240 purchases: $26.50, compared with $30.00.
The cost crossover occurs at $600 ÷ ($30 − $24) = 100 purchases. Below that volume, the cheaper media has not recovered the additional rights fee.
This is a cost comparison, not a profitability claim. For the full campaign, start with revenue after refunds, then subtract product costs, fulfillment, channel fees, and all media and creator-program expenses. Calculate new-customer acquisition cost separately when the new-customer denominator is reliably known.
Before renewing a successful asset, repeat the calculation using the renewal fee and expected remaining productive usage. Do not assume the original test’s media efficiency will persist at a larger budget.
Measure the Test Without Overclaiming the Result
Decide what the experiment is intended to prove before comparing ads. Testing a different creator, script, offer, audience, and landing page at once evaluates a complete campaign package; it does not isolate the effect of the partnership format.
To investigate the format itself, hold the creative and other material conditions as similar as the permitted setups allow, and use a properly designed randomized comparison where feasible. Where randomization is unavailable, describe the results as directional rather than causal.
Separate early diagnostics from business outcomes. Spend, delivery, outbound clicks, and landing-page visits help identify operational or creative problems. Purchases, cost per purchase, net revenue, and contribution after campaign costs determine whether the test supports further investment.
Choose a reporting window before launch that accommodates the product’s buying cycle and the attribution settings being used. Monitor delivery daily, but do not declare a winner from the first few purchases; allow delayed conversions and returns to inform the final assessment.
Keep Meta, store analytics, and marketplace results identifiable rather than adding their credited sales together. Stack Influence’s broader guide to tracking influencer marketing supports maintaining creator and campaign identifiers across the reporting workflow.
Diagnose the Specific Failure
When an ad cannot launch, check the exact error, permission status, account eligibility, and selected asset first. Rebuilding the campaign will not solve a missing creator approval or an ineligible piece of content.
When clicks arrive without purchases, check the destination, offer, stock, mobile experience, and measurement before concluding that the creator is unsuitable. A wrong product variant or broken tracking path deserves a different response from a weak sales argument.
When performance declines after a promising start, review changes in spend, audience exposure, offer, stock, and creative. Recheck the usage end date before preparing new edits or expanding distribution.
Turn Creator Content Into an Accountable Ad Test
The practical lesson of this Meta partnership ads guide is to manage each creator asset as an advertising commitment, not just a completed post. Connect the license, platform permission, exact creative, destination, and campaign costs before scaling.
Start with a small set of fully documented assets and a measurable purchase destination. For brands building a repeatable supply of creator content, plan a Stack Influence product-seeding campaign with paid-use requirements and partnership-code requests defined upfront, so the next batch arrives with a clearer path to testing.