



To add a working website link to an Instagram post, first check whether your account offers the dedicated Add link feature. Eligible paid accounts can attach a destination while creating the post. If that option is unavailable, direct viewers to a profile link or a companion Story with a Link sticker.
The important distinction is where the viewer can actually tap. A web address written in a caption is not the same as a link attached through Instagram's publishing controls. Your caption should describe the route you have set up, whether that means opening the post's link, visiting your profile, or viewing a Story.
Key Takeaways
- Check your account's available features before promising a clickable link on a feed post.
- Use a profile destination or Story Link sticker when direct post linking is unavailable.
- Give the destination a specific name so people can find the resource mentioned in the caption.
- Test the complete route as a viewer, and keep destinations useful for people discovering older posts.
1. Add a Link Directly to an Eligible Instagram Post
Instagram supports direct post links through eligible paid Meta One plans. Meta's creator plan comparison lists Instagram post links under Advanced and higher tiers, with benefits and availability varying by region, app, and account.
Check the offer displayed for your own profile before subscribing. A verification badge alone is not a sufficient buying criterion: the benefit you need is access to links on Instagram posts.
Attach the Destination Before Publishing
Meta's current post-link instructions apply to eligible public accounts and exclude teens.
- Create the post and write its caption.
- Select Add link and enter the destination URL.
- Tap Done, then publish.
Check the address before sharing because the attached link cannot be edited afterward. Open the published result as a viewer and confirm that it reaches the intended page.
Prepare the destination before the creative. For a newsletter post, that might be the public subscription page; for a tutorial, the specific supporting resource. Avoid discovering at the publishing screen that the only URL you have opens an account dashboard or an unfinished page.
Plan Around the Post Allowance
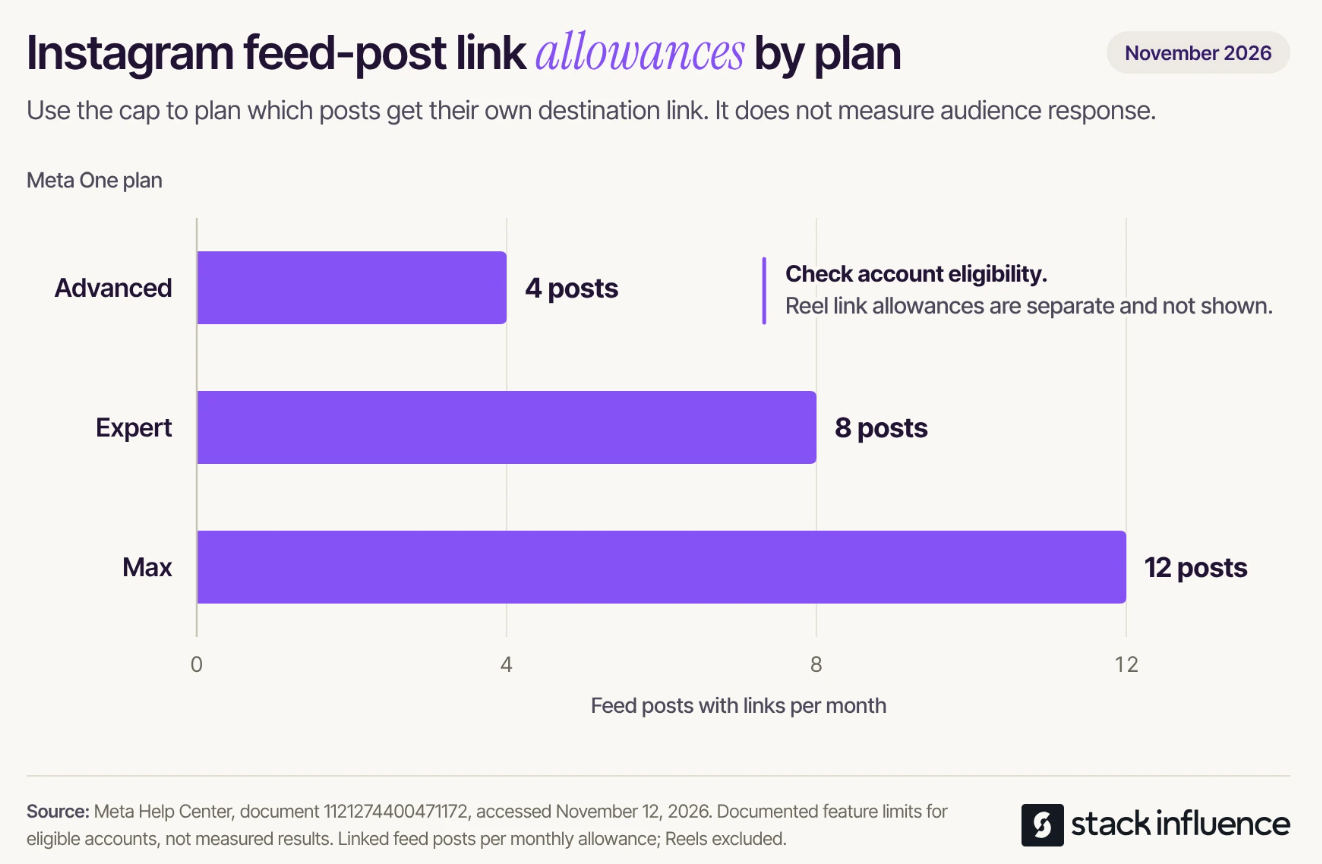
The same guidance lists these monthly feed-post allowances, checked November 12, 2026:
- Advanced: 4 posts with links.
- Expert: 8 posts with links.
- Max: 12 posts with links.
Reels have separate allowances. Capacity resets at subscription renewal, and unused capacity does not roll over.
Use those limits when planning which posts need their own destinations. A launch announcement or a resource with a distinct landing page may deserve a slot more than a general update. The allowance describes publishing capacity; it provides no evidence about clicks or sales.
If Add link is absent, continue with one of the following routes. Do not buy a plan on the assumption that every account receives the same features.
2. Give the Post a Clear Profile-Link Destination
A profile link provides a destination that you can name in the caption. Meta's profile-link announcement illustrates external website links managed through the profile editor.
In the Instagram app, follow this functional sequence:
- Open your profile and its editing controls.
- Find the Links section.
- Choose the option for adding an external website.
- Enter the destination, save it, and return to your profile.
- Tap the visible link and check the page that opens.
Follow the labels displayed in your app; the important task is adding a website through the profile's link controls.
Then write a caption that tells readers what to select. “Open my profile and choose ‘Desk Setup Checklist’” is more actionable than “More info in bio.” The named destination should be easy to recognize when someone arrives.
Choose a Direct Destination or a Resource Page
Use a direct destination when the post has one clear next action, such as booking a session or reading a particular article. A resource page can make sense when several active posts refer to different materials.
For example, a creator could maintain a page with separately named entries for a lighting checklist, editing presets, and a portfolio. Each caption should name the relevant entry. This is an illustrative organization method, not a requirement to purchase a link-management service.
Keep the important choice visible. A link page full of unrelated offers may technically contain the resource while still making it difficult to find.
3. Pair the Post With a Story Link Sticker
A companion Story gives viewers another place to access the website. Meta's Link sticker announcement describes adding a destination through the Story sticker tray.
- Create a Story using a photo or video relevant to the post.
- Open the stickers and choose Link.
- Enter the destination and confirm it.
- Place the sticker where it is easy to see, then share the Story.
Add nearby text explaining the destination, such as “Open the full lighting checklist.” Test the published sticker and the page it opens.
This route adds the website to the Story. It does not change the feed post's attachment. Make that clear in the caption, and avoid a lasting “see today's Story” instruction unless you also maintain another way to find the resource.
For a product recommendation, show enough context for viewers to recognize the item after tapping. If you need an Amazon-specific workflow, Stack Influence's guide to adding an Amazon link to an Instagram Story explains the different destination choices.
Keep the Story and Caption Consistent
Use the same resource name in the feed caption, Story text, and destination heading. If the caption promises an equipment list, the Story should point to that list rather than an unrelated storefront.
For a time-sensitive offer, make its timing clear wherever readers encounter it. When the offer closes, review the destination and any continuing profile instructions so that late visitors receive an accurate explanation.
Keep Older Posts Pointing to the Right Resource
The most useful link setup remains understandable after your next post goes live. Changing your profile destination requires checking what earlier captions still promise.
Imagine publishing a carousel about desk lighting and telling readers to visit the link in your bio. A week later, you replace that destination with a different campaign. Someone discovering the carousel now follows its instruction and reaches the wrong page.
You can prevent that mismatch by keeping a stable resource page, retaining a clearly named profile destination, or revising the old post's directions where your editing options allow it. Choose the simplest arrangement that preserves the promises of the posts you still want people to use.
Make the Caption Specific
These illustrative lines show how the instruction changes with the route:
- Attached post link: “Open the link on this post for the complete lighting checklist.”
- Profile link: “Visit my profile and choose ‘Desk Setup Checklist.’”
- Companion Story: “The checklist is linked in my current Story. You can also find ‘Desk Setup Checklist’ on my profile.”
Use only the wording that matches the destinations you have actually published. The third example requires both a Story and a profile destination.
Avoid calling something a free download if the destination requires payment. If registration is necessary, say so before the click. The goal is a predictable next step, not simply a larger number of taps.
Give a Link Page a Maintenance Rule
For each active resource, keep its name, destination, and any expiry condition in your publishing notes. Before replacing or removing a destination, identify the posts that refer to it.
If a workshop closes, an accurate “registration closed” page with a relevant next option is clearer than silently sending visitors to an unrelated offer. If a product changes, explain the change rather than leaving the caption and landing page describing different items.
Troubleshoot the Link Before Changing Your Content Strategy
Start by identifying which part of the route fails. An unavailable publishing feature, an incorrect destination, and a page that loads poorly require different fixes.
The Direct-Link Control Is Missing
Check the benefits offered to the profile you are using. If the control remains unavailable, choose a profile destination or companion Story and adjust the caption to match.
The Story Link Sticker Is Missing
Confirm that you are creating a Story and looking in its sticker tray. Meta's original rollout guidance excluded newly created accounts and accounts repeatedly violating its rules, so availability should not be assumed from follower count alone.
Use the account's current notices and help options to investigate a restriction. Avoid diagnosing the cause solely from the missing sticker.
The Link Opens the Wrong Page
Compare the destination with the exact promise in the post. Check the resource, product variation, region, and any sign-in requirement.
For brand work, ask for the approved campaign destination before replacing a supplied link with your own. A page that looks similar can still be the wrong resource for that assignment.
The Page Opens but the Task Fails
Test the next action. Submit the intended signup form, open the downloadable resource, or check the booking flow far enough to confirm it works without making an unintended purchase.
Repeat the check from a visitor's perspective. A page that works while you are signed in as its owner may not work for an ordinary reader. If the route includes a link hub, test the final destination as well as the hub.
Should You Pay Just to Add Links to Posts?
Paying is worth evaluating when a direct post destination solves a recurring need and the account-specific offer fits your budget. First establish what the profile-link or Story route already accomplishes.
At the November 12, 2026 check, Meta's published creator pricing displayed Advanced at USD $49.99 per month per profile. Your actual offer can vary, so use the amount shown for your account when making a decision.
Consider an illustrative affiliate-sales calculation. Allocate the entire $49.99 monthly subscription to direct linking, assume no subscription tax or other fixed expense, and let each additional completed qualifying sale produce one of three assumed net commission amounts after reversals and variable costs:
- At $5 retained per additional sale, 10 additional sales cover $49.99.
- At $10 retained per additional sale, 5 additional sales cover $49.99.
- At $20 retained per additional sale, 3 additional sales cover $49.99.
The calculation is monthly cost divided by net earnings per additional sale, rounded up to the next whole sale. These assumed earnings are not commission benchmarks.
This calculation shows a cost threshold, not expected performance. Sales that would have occurred through your existing profile or Story links are not additional sales created by the paid feature. Actual results also need to account for taxes, other expenses, and the value of any subscription benefits you already use.
If you cannot yet estimate the value of the extra functionality, establish a working destination and observe your existing results before upgrading.
Check Disclosure and the Complete Visitor Journey
A working link does not explain a paid or gifted relationship by itself. The FTC's disclosure guidance for influencers says material connections should be clear alongside the endorsement, including when a creator receives free products.
State the relevant relationship plainly. For an affiliate recommendation, a line explaining that you earn a commission communicates more than an unexplained label. For Story endorsements, put the disclosure on the visual where it can be noticed; do not rely only on a profile statement.
Before you finish, check five things:
- Placement: The viewer has a visible, working place to tap.
- Promise: The caption names the correct destination and action.
- Access: The page works for the intended audience without your owner permissions.
- Relationship: Any sponsorship, gift, or commission arrangement is clearly explained.
- Continuity: Earlier posts still lead people to the resources they mention.
If you work with a brand, record which placement you published and the approved destination used. That makes a later correction easier without claiming that clicks, purchases, and completed campaign deliverables are interchangeable.
Publish a Route Your Audience Can Follow
Choose the link option available to your account, make the caption describe it accurately, and test the destination before sending people there. Keep a reliable profile route for resources that remain useful after a Story or launch has passed.
The final check is simple: can someone encountering the post for the first time reach the promised resource and complete the next step?